
Now I would like to learn about Revolve command. Meanwhile, on our sketch we use the line, offset, copy, trim and region command. Follow the steps below to learn Revolve Menu on AutoCAD, and here is How to Use Revolve Menu on AutoCAD – AutoCAD Tutorial.
How to Use Revolve Menu on AutoCAD – AutoCAD Tutorial

1. Click line menu. Then choose the first point by typing 0,0 and enter. Then @0,40 then enter.


2. Click offset menu. Then type the offset distance 20 and then click enter. Choose the line and drag it to the right side.

3. Click the line command again. Then choose the first point from 0,0 point, same like the first line, then type @40,0 and here is the result.

4. Click the offset command and type 15, then enter. Choose the line that we’ve just made before.

Then the result will be like this.

5. Click the offset command again but for this, type 20 and enter. Choose the line like this below image

Click to the right side, then the result would be like this.

 6. Click copy then choose this below line and enter.

Then choose the first point like this below image.
 |
Then choose the end point like this below image.

And then, here is the result.


7. Click the Trim command then type “ALL” and the enter twice, till the image will be like this.
 |
And then Trim several lines till being like this below images.

8. And now, we’re gonna make the axis rotation or the line center for being the revolve criterion later. Here is the way of offset command, then type 8 and enter. Choose the line like this below images.

Click to the right side till the offset result being like this below images.


9. Use SW Isometric command in order that we can see clearly the object that we will revolve like this bellow image.
 |

10. Before we revolve it, for make an object we need to combine the several lines. Choose region command then the several lines that we would combine like this below images.


11. Now, revolve the object by choosing to revolve command then choose the object that we will revolve like this below images.

After that click enter. Then choose the first point for the center rotation like this bellow image.

Then click the endpoint. Like this below image.

After that, you’ll be asked to type how degree that you want to revolve this object. So that, just type 360 degree for revolving one full circle then click enter. Then the object will look like this.


12. choose the conceptual visual style command for seeing the 3D displays more clearly from the object that we’ve just made. See this 3D images bellow.

More from my site
 How to Create Pipe Using Sweep Feature Command – AutoCad Tutorial
 How to Extrude Path in AutoCAD – AutoCAD Tutorial
 How to Design Control Arm With AutoCAD – AutoCAD Tutorial
 How to Make Bracket by Autocad – AutoCAD Tutorial
 The Introduction of Autocad – AutoCAD Tutorial Basic
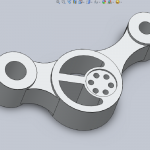 Let’s Design Control Arm With Solidworks – Solidworks Tutorial


